
How to Install FV816 Foundation Crawlspace Vents and How to Install Garage Vents for 8 x 16 Openings
EZRvent FV816 - 8x16 Garage and Foundation Crawlspace Vent Installation Instructions
Basic Installation Drawings and Installation Steps

EZRvent FV816 8x16 Foundation Crawlspace Garage Vent Installation Drawing
Pro Tips:
To Caulk or not to Caulk:
Less is more . . . EZRvent frames have been designed not to trap water, allowing it to pass and weep out. If caulking, apply it only to the top and side Caulk Groove guide channel, keeping the bottom open to allow water to drain freely.
*Note: Improper application of caulking or over-caulking can actually lead to more harm than good. It is important not to trap water when caulking your vents. *Do not apply a Caulk bead along the bottom edge of FV816 vents to allow for proper drainage.
Black-out Paint Jam Sill:
On high-end jobs, after prepping your opening, use black spray paint to paint the opening jam sill, and remaining vent frames or vent forms in the vent opening. This really makes the backgrounds disappear and the finished job look great!


Detailed Installation Drawings and Installation Steps

EZRvent FV816 8x16 Foundation Crawlspace Garage Vent Installation Guide S1
** Step 1B Note: See the example below of prepped vent form in the detailed instructions section
ac")
EZRvent FV816 8x16 Foundation Crawlspace Garage Vent Installation Guide Step 2
*** Step 2B Note: See the example below of spacer tab removal in the detailed instructions section

EZRvent FV816 8x16 Foundation Crawlspace Garage Vent Installation Guide Step 4
Optional FL816 Louver Installation Drawings and Installation Steps

EZRvent FV816 8x16 Foundation Crawlspace Garage Vent Installation Guide Step 5 FL816 Louver
Other Construction and Special Case Detailed Instructions
**Step 1B: How to modify concrete vent forms to fit FV816 vents
The FV816 8x16 Replacement vent was designed to fit Gibraltar/Airvent poured-in-place block vent forms. The center divider and side tabs will need to be removed to 2" deep, as shown in the example below. This is easy to achieve by drilling a few holes in the center divider 2" deep, then breaking them out by flexing and twisting them out with channel-lock pliers. Using a Multi-Tool, Dremel Tool, Box Saw, Hack Saw, or other cutting tools is another option.

Example of 8x16 plastic foundation block vent openings prep to fit EZRvent FV816 foundation vents

8x16 Foundation Form Modifications - Quick Prep Instructions - Remove center and side tabs to 2 inched deep.

Vent Form Prep - Center Removal prep adding break out holes

Vent Form Prep - Center Removal break out using channel-lock pliers as a simple option
***Step 2B: How to modify spacer tabs to fit standard EZRvent sizes
The FV816 8x16 Replacement vent was designed for opening dimensions between: Height: 6-¾ to 9” - Length: 15-½ to 17-½” of the inner rough openings. The smaller dimensions are achieved by removing the spacer/ trim tabs, as seen below. This is an easy modification to do by twisting them off using channel-lock pliers, or cutting them off using a Utility/ Box Knife, Exact-blade, Nippers, Multi-Tool, Dremel Tool, Box Saw, Hack Saw, or other cutting tools.

EZRvent trim tab spacers can now be removed with a box knife or channel-lock pliers
How to modify non-standard Rough Openings to fit standard EZRvent sizes
Smaller sub-floor and soffit Rough Openings can be re-sized and opened up to any standard EZRvent designed size with good results. This provides an added benefit of increasing air flow.
Non-standard Rough Opening Modification
Painting EZRvent Vent Frames
See our detailed EZRvent Painting instructions for How to Paint Polypropylene Frames

How to Paint Polypropylene Foundation Vents

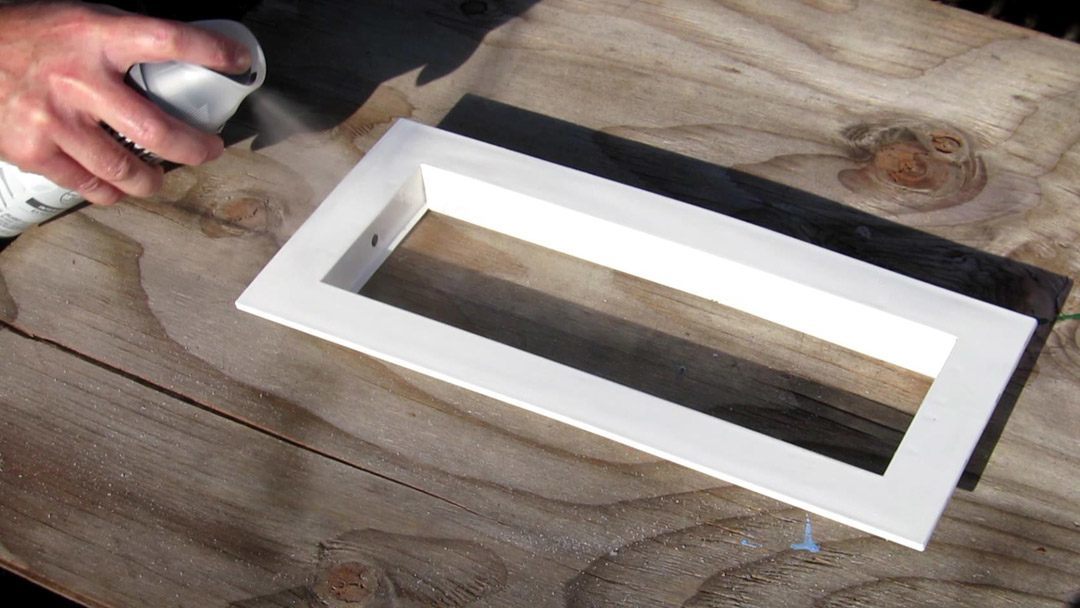
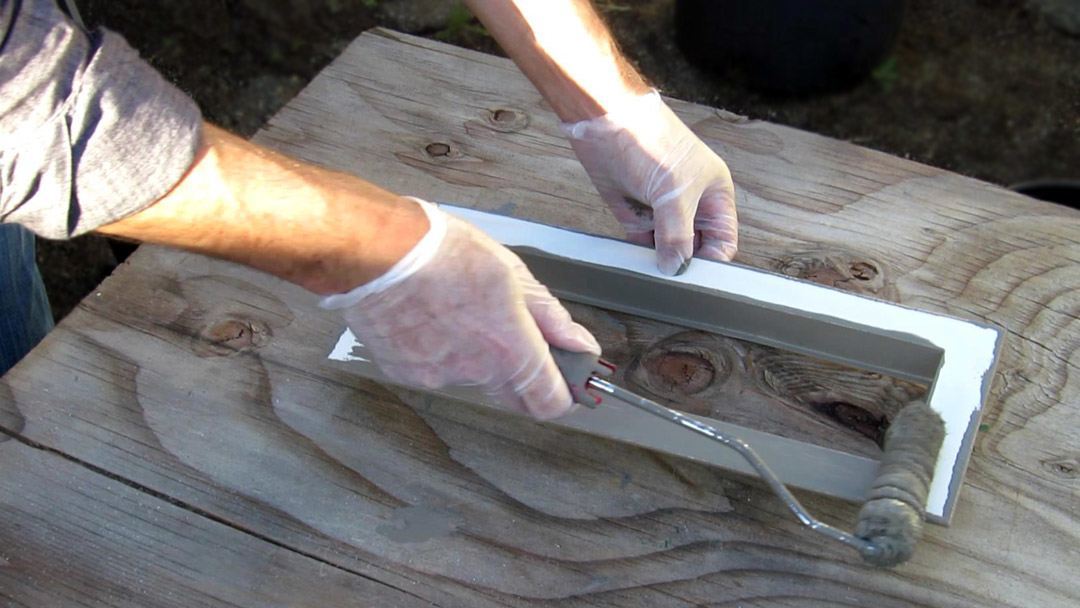
Prep & Prime are Both Important Steps not to be skipped for long lasting results
The following sections are in draft update from FV100 instructions and are in the process of being updated.
Thin Walls, Doors, and Cabinet Surface Installation Instructions:
(Garage Door Installation, Soffit Installation, Plywood Panel Installation, and False Ceiling Vent Installation Installation)
- Create (2) 1-2” square or rectangular trim “Toggle Boards” at least ½” larger than the smaller rough opening dimension. (These will serve as toggles on the inside of your opening)
- Drill a through pilot hole in the center of your trim Toggle Boards.
- Depending on wall / surface thickness to screw length; Toggle Boards can be pre screwed/ started into place with the Vent Frame.
- Position Vent Frame with Toggle Boards into rough opening with thin Walls, Doors, and Surfaces between the Vent Frame and Toggle Boards.
- Tighten Screws and Vent Frame into place. (Tighten until just snug. Do not over tighten.)
How to Remove - Sizing Spacer Tabs - Standard Optional Sizes
Removing the Sizing Spacer Tabs, which are on the backside: With our updated frame designs, EZRvent Sizing Spacer tabs are now easier to remove, either with a box knife or by simply twisting them off with channel lock pliers.
This is an easy modification to do with a Utility/ Box Knife, Exact-blade, Nippers, Multi-Tool, Dremel Tool, Box Saw, Hack Saw, or twisting off with Channel Lock pliers.

Special Cases - How to install EZRvent foundation and garage vents into obstructed vent openings:
Vent obstructions can be: Cable or Phone Wires; Framing Blocks; or Plumbing Pipes. The following are shown with the FV100 5x154 size but also apply to the FV816 8x16 ,size.
Installation with Cable or Phone Wire Obstructions:
In most cases, Cable wires can be accommodated by simply installing our FV816 foundation/ garage vents with no modifications. Remove your existing vent screen as in all other vent installs. Route the Cable/ Phone wire to the bottom or lower side of your vent opening. Install foundation vents on top of the cable wires. The top of the vent flange should be tight against the wall and the bottom will stand out the thickness of the cables. The EZRvent spacing shims will allow for the cables to not be kinked.
Installation with Concrete Vent Form Center supports or other Framing Block Obstructions:
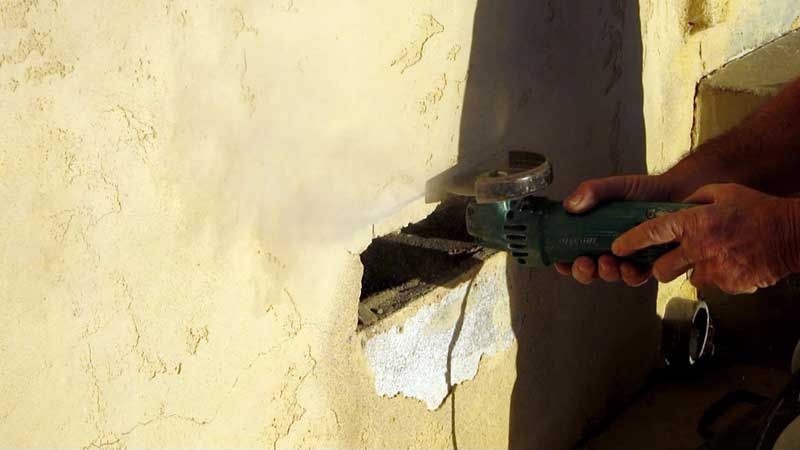
EZRvent FV816 foundation garage vents set almost 2 inches from the outside wall surface. Depending on the thickness of your stucco or siding relative to the internal obstructions, notch the supports or framing blocks by 2 inches. Framing blocks can easily be notched with a Chisel, multi-tool, Dremel Tool, or Router, and this does not affect the structural integrity. Install foundation vents as per above.
Installation with Pipes , Plumbing , or Conduit Obstructions:
Using the following methods, it is possible to get a very tight pest-free mesh closure around the Pipe Obstruction. EZRvent FV816 foundation vents and garage vents are designed to be quite flexible to conform to non-flat walls. This also helps when modifying and fitting around pipe routing obstructions. Best results are achieved when using our SS or Copper mesh options as the mesh is more conformable and mesh cuts are corrosion resistant. If desired, or required to close in a gap after a troublesome install, use a small bead of caulk around the pipe. Adding additional metal wool or spray foam should not be required and is not desirable for a professional install.
For 1- 1 ½ Pipe or Conduit Obstructions : (SS or Copper Mesh recommended)
- make a single cut in the vent frame and mesh in the shortest dimension to the Pipe intrusion center. Cut a small * at the Pipe center 1/2" smaller than diameter of the pipe.
- Install vent by flexing frame to allow pipe to pass through and along slit cut in mesh.
- form mesh around pipe (Star Cut flaps oriented in). Mesh openings around pipe should be compressed and tight.
- Use wire of similar mesh material to sew mesh cut together. (With SS & Copper vent options, many times, it is possible to strip a single strand of mesh off of the back from extra extending outside of the heat stake bond line)
- Use a small bead of caulk around the pipe to seal any gaps
Vent Frame cuts can be mended with painters or bathroom caulk. Frames can also be mended using auto body bumper repair PP welding methods. - If more flexibility is needed in the frame, it can be gently heated from the back side to help slide it around the pipe without using the following double cut method.

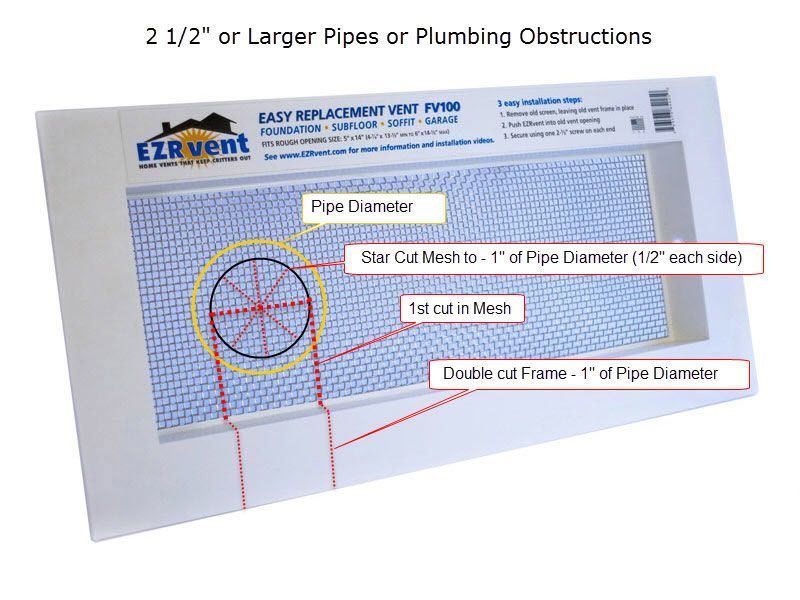
For 2” or greater Pipe Obstructions: (SS or Copper Mesh recommended)
- Make two cuts, spaced 1" smaller than the diameter of the pipe equal distance to the center line of the pipe.
- Cut a * in the mesh at the pipe center the .5" - 1" smaller then the diameter of the pipe.
- Install foundation vent by flexing frame around pipe
- Form mesh around pipe (Star Cut flaps oriented in). Mesh openings around pipe should be compressed and tight.
- Piece in vent cut-out.
- Use wire of similar mesh material to sew mesh cut together (With SS & Copper vent options, many times, it is possible to strip a single strand of mesh off of the back from extra extending outside of the heat stake bond line)
- Use a small bead of caulk around the pipe to seal any gaps
Vent Frame cuts can be mended with painters or bathroom caulk. Frames can also be mended using auto body bumper repair PP welding methods.
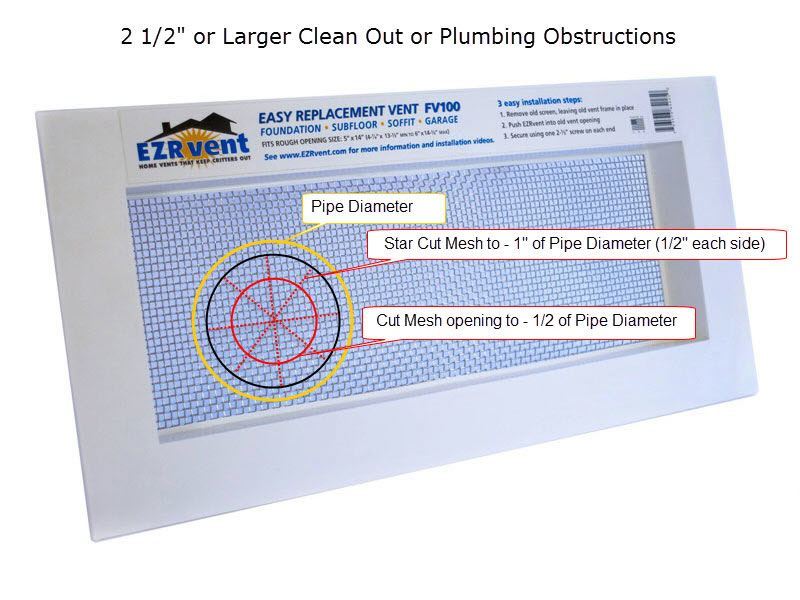
For 2” or greater Clean Out Pipe or Terminated Obstructions: (SS or Copper Mesh recommended)
- Cut Mesh opening to 1/2 diameter of the pipe.
- Cut a * in the mesh at the pipe center the .5" - 1" smaller then the diameter of the pipe.
- Form mesh around pipe (Star Cut flaps oriented in). Mesh openings around pipe should be compressed and tight.
- Use a small bead of caulk around the pipe to seal any gaps